Isometric Game - Part 1
View Shockwave Demo | Download Source Movie
At the heart of an isometric game is a map of tiles. This can either be a long linear list where, for example, the first 10 items are the first row, the second 10 items are the next row and so on. Alternatively, you could use a list of 'rows', where each row is a list of tiles. In this tutorial, we will use this second approach.
This map of tiles will look something like this:
Map = [

[tile, tile, tile, tile],

[tile, tile, tile, tile],

[tile, tile, tile, tile],

[tile, tile, tile, tile],

[tile, tile, tile, tile],

[tile, tile, tile, tile],

[tile, tile, tile, tile],

]
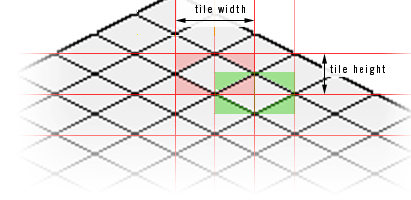
And when we draw the tiles, we will end up with something like this:
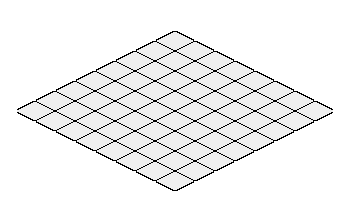
To draw these tiles, we need to draw each row from the top (back of the map) down. By painting the tiles this way, the front most tiles can overlap the back tiles.
The algorithm for drawing the tiles is a little convoluted. The first step is to work out the starting position of the first (top-middle) tile. Once we know this, we can loop through the map drawing each row a half-tile height below and a half-tile width to the left of the previous row, and each tile in a row a half-tile height below and a half-tile width to the right of the previous tile.
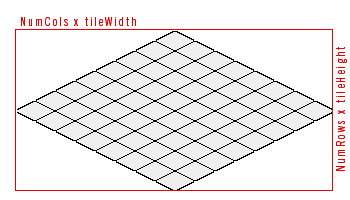
So, to work out the starting position, we need to work out the overall size of the rect enclosing the map. Assuming the number of columns and the number of rows are the same, the width will be equal to the number of columns * the tile width, and the height is equal to the number of rows * the tile height.
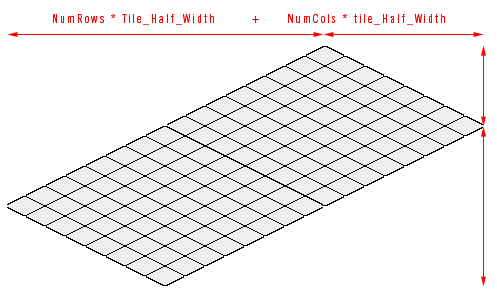
However, if the number of rows and the number of columns are different, the equation is a little different: The overall width is the number of columns x tilewidth/2 + the number of rows x tilewidth/2.
Also note that since we might have tall tiles that will extend above the top of the diamond, we will push the whole diamond down a little by adding a vertical offset:

So our initial lingo to determine the horizontal offset (hOffset) and vertical offset (vOffset) from the top left of the enclosing rect might look like this:
[Initialise map method - excerpt]

-- basic info about the tile size

BaseTileImage = member(?basetile?).image

Tile_W = BaseTileImage.width

Tile_H = BaseTileImage.height

-- number of rows and columns

NumCols = count(aMap)

NumRows = aMap[1].count

-- decide on a vertical offset (if any)

vOffset = 40 -- or whatever

-- calculate the overall size of the iso-world

IsoWidth = NumRows * Tile_HalfW + Numcols * Tile_HalfW

IsoHeight = NumRows * Tile_HalfH + Numcols * Tile_HalfH + vOffset

-- now we can find horizontal the position of the first tile

hOffset = IsoWidth/2
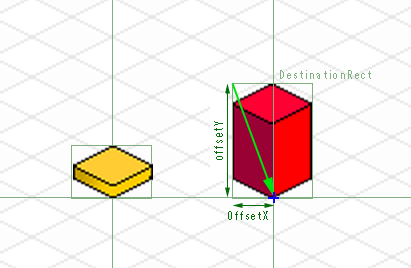
Now, hOffset and vOffset tells us the point of the top of the top most tile relative to the top-left of the overall rect enclosing the diamond. However, when we paint the tiles, we will be specifying the top-left of the rect of the tile - so we need to adjust the hOffset offset slightly. We will also need to take into account the 'regPoint' of the base tile. Since some tiles will be taller than others, it is convenient to set set the regPoint of all tiles to the bottom-middle. Therefore, we need to adjust the offsets like this:
  hOffset = hOffset -  baseTile.regPoint.locH - Tile_HalfW

  vOffset = vOffset + baseTile.regPoint.locV
Now to draw the tiles, we will need to know a few properties about the tile: their width, height, and how to position their rect relative to the position of the tile (ie - their offset)
Tile Objects
So assuming our map will be a list of cast member names, lets create a basic script for a class of "Tile Objects" like this:
[Parent Script "ISO.tile"]

property Name

property image

property offsetX

property offsetY


on new (me, aMemberName)

  Name = aMemberName

  memberRef = member(aMemberName)

  image = memberRef.image

  offsetX = memberRef.regPoint.locH

  offsetY = memberRef.regPoint.locV

  return me

end
So far this script doesn't do much other than define some properties for our tile objects including an offset based on the tile member's regPoint
Now lets assume we are eventually going to store our maps in files or cast members and these maps are essentially lists defining some properties about the tile (such as the name of the cast member to use, whether the tile is 'walkable', whether it animates etc). The process for reading the map and creating tile objects would be like this
mapList = GetMapList() -- read from file

NumCols = count(mapList)

NumRows = mapList[1].count

repeat with y = 1 to NumCols

  repeat with x = 1 to NumRows

	tileDetails = mapList[y][x]

	createTileObject(tileDetails) -- instantiate with params

  end repeat

end repeat
However, for the purposes of this tutorial we will just create some random maps and the only property we will define for each tile is the name of the cast member to use. The lingo the create a random map of tile objects will look like this:
  aMap= []

  repeat with  y = 1 to 16

    aRow = []

    repeat with x = 1 to 16

      tileName = "tile-" & random(10)

      tileObject = script("ISO.tile").new(tileName)

      aRow.append(tileObject)

    end repeat

    aMap.append(arow)

  end repeat
Mapped Tile Objects
When we place the tiles into the world, they will have some additional properties - such as their position within the world. So lets make another class of "mapped tile' which is a special instance of our basic Tile Object.
[Parent Script "ISO.tile.mapped"]

property ancestor

property worldx, worldy -- world coordinates

property sourceRect, destRect


on new (me, tileObj, wx, wy)

  ancestor = tileObj

  worldx = wx

  worldy = wy

  sourceRect = tileObj.image.rect

  destRect = tileObj.image.rect.offset(worldx, worldy)

  return me

end


on Paint (me, buffer)

   buffer.copyPixels(me.image, me.destRect, me.sourceRect, [#Ink: 36])

end


on Overlaps (me, aRect)

  return (destRect.intersect(aRect) <> rect(0,0,0,0))

end


on Inside (me, aPoint)

  return aPoint.inside(destRect)

end
This script doesn't do much at this stage -other than defining some properties for our mapped tiles, as well as a couple of simple methods that may be useful. However, by setting the basic tile object to be an ancestor of this object, our 'mappedTile' objects created from this script will inherit all the properties and methods of the basic tile.
Placing Tiles
To place tiles, we now loop through the map, calculating their x and y locations based on their position in the map. Here's the main lingo routine placing tiles, and created 'mappedTile' objects:
[Initialise map method continued]


  -- Build the map

  my = NumCols -1

  mx = NumRows -1


  mapList = []

  repeat with y = 0 to my

    row = []

    repeat with x = 0 to mx

      tile = aMap[y+1][x+1]

      wx = (x * Tile_HalfW + tile.offsetX) - (y * Tile_HalfW) + hOffset

      wy = (x * Tile_HalfH - tile.offsetY) + (y * Tile_HalfH) + vOffset

      mappedTile = script("ISO.Tile.Mapped").new(tile, wx, wy)

      row.append(mappedTile)

    end repeat

    mapList.append(row)

  end repeat
Once we have initialised the map, it is relatively easy to draw the result - we loop through the list of mapped tiles and tell them to paint themselves onto our output image.
on RepaintBuffer (me)

  buffer.fill(buffer.rect, rgb(0,0,0))

  repeat with y = 1 to NumCols

    call (#paint,  mapList[y], buffer)

  end repeat

end
Interacting with the map
Two key methods you need for interacting with the map are a method for translating world coordinates (such as the mouseLocation) to ISO coordinates (ie which tile is clicked), and another method translating ISO coordinates back to world coordinates.
on ISOtoWorld (me, ix, iy)

  -- returns the point in the middle of the specified tile

  wx = (ix * Tile_HalfW + basetile_offsetX) - (iy * Tile_HalfW) + hOffset

  wy = (ix * Tile_HalfH - basetile_offsetY) + (iy * Tile_HalfH) + vOffset

  return point(wx+Tile_HalfW,wy+Tile_HalfH)

end


on WorldToISO (me, wx, wy)

  -- returns ISO coordinates of a world point

  dx = wx - HOffset - Tile_W

  dy = wy - VOffset + Tile_HalfH

  x = integer((dy + dx / TileRatio) * (TileRatio / 2) / Tile_HalfW)

  y = integer((dy - dx / TileRatio) * (TileRatio / 2) / Tile_HalfW)

  if x < 0 or y < 0 then return 0

  if x >= (NumRows) or y >= (NumCols) then return 0

  return point(x,y)

end
If you want to get a reference to the tile object at a particular location, you could add a method like this:
on GetTile  (me, ix, iy)

  -- returns a reference to the specified tile object

  return mapList[iy+1][ix+1]

end
So, if you want to send a mouseDown message to a tile, for example, then you could create a behaviour like this
on mouseDown (me)

  p = the mouseLoc

  i = Tiler.WorldToIso(p.locH, p.locV)

  if i.ilk = #Point then

    -- clicked a tile

    tile = Tiler.GetTile(i.locH, i.locV)

    tile.mouseDown()

  end if

end
The Full Script
Download Source Movie for the finished script.